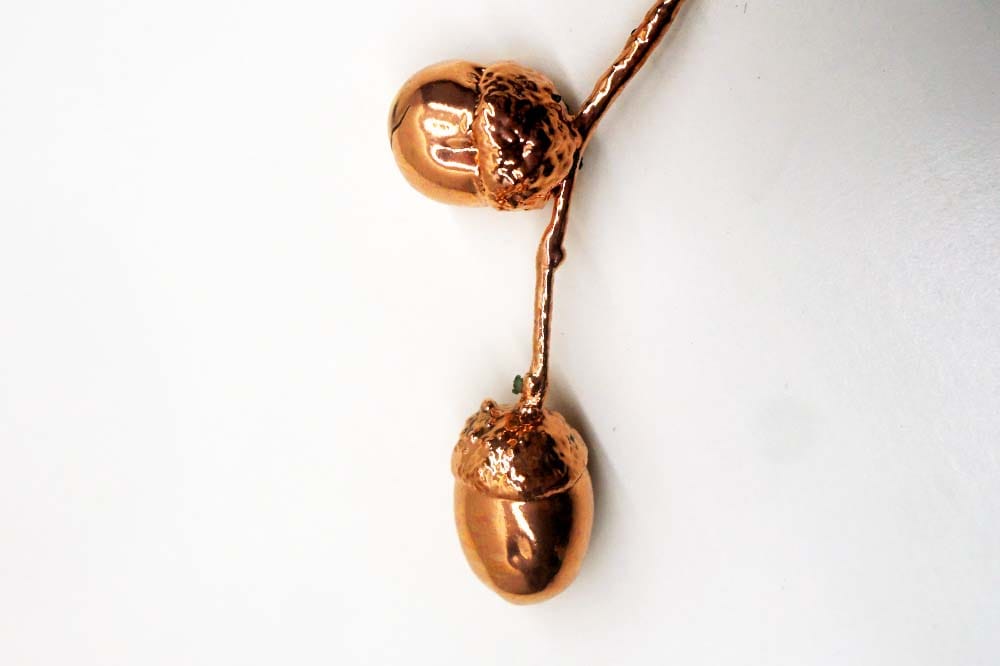
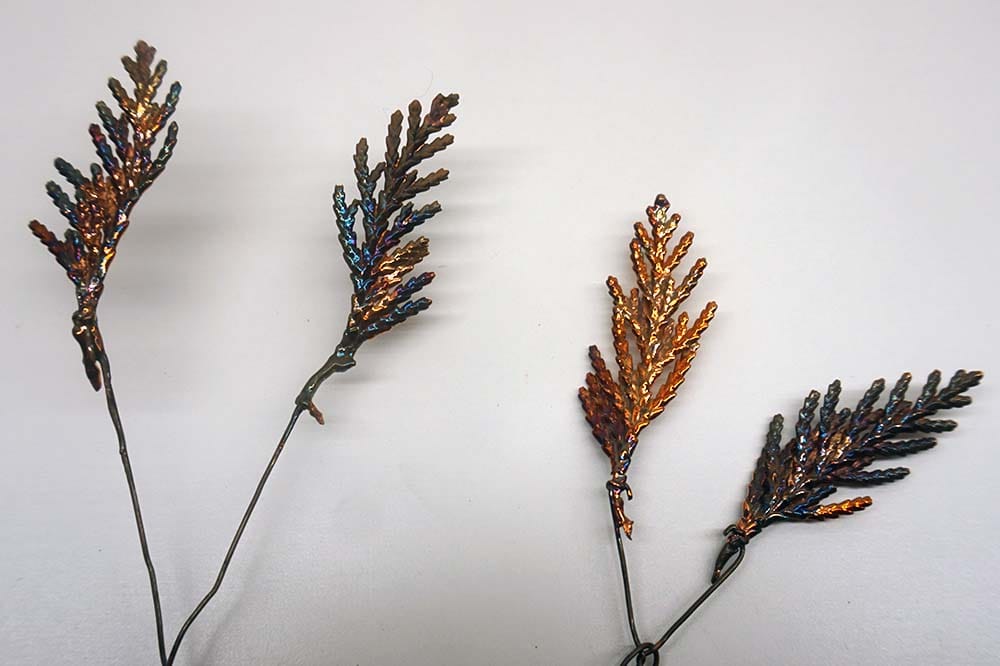
In this guide, you’ll learn step-by-step how to apply electroforming to various objects, such as leaves, 3D prints, twigs, acorns, insects, and more. While this guide is mostly focused on organic material because of the extra preparation it requires, you can also use the techniques for other materials such as stone, plastic, glass, fabric, and other objects.

Preparing and coming up with a design
Before you start the electroforming process, it is useful to make a clear design. This can be as simple as a sketch of what you want the end result to look like. If you’re new to electroforming, start with a simple design to get the hang of the process.
You can use many different types of materials to bring your design to life. Popular choices include copper wire, twigs, resin, wax, modeling clay, and 3D prints. You can also incorporate various objects into your design, such as crystals, gemstones, leaves, acorns, insects, pine cones, feathers, bones, toys, glass, and metal parts. The possibilities are virtually limitless, as long as the material is well prepared for the electroforming process.
Measuring the Design
The surface area of the piece to be treated determines the setting of the amperage (ampere) on the power supply. The rule of thumb is about 0.1 amps per 10 cm² of surface area.
Measuring the surface area can be tricky. Use this area calculator to help you calculate different sizes.
Many objects have intricate shapes and are difficult to calculate accurately, but a rough measurement is sufficient. Divide the object into simpler shapes such as cylinders, squares, and rectangles that best fit the object. For example, a twig can be considered a cylinder and a stone as a sphere. More complex shapes can be broken down into individual shapes, and the surfaces of these shapes can be summed up. A flower on a stem can be seen as a small ball on a long thin cylinder.
Write down the measured area and divide it by 10 to calculate the number of units of 10 cm². Multiply this number by 0.1 to determine the current setting.
Example:
- If your item has an area of 40 cm², divide 40 by 10, which gives 4. Multiply 4 by 0.1 to set a 0.4 amp current setting on your power supply.
- If your item has an area of 125 cm², divide 125 by 10, which gives 12.5. Multiply 12.5 by 0.1 to set a current setting of 1.25 amps.
Tip: If you want to electroform a 3D print, you can find the exact surface of the printed object in the software, which is very useful!
If you don’t have any experience with electroforming, it can be helpful to start with 5 to 10 walnuts of about the same size. That way, you have some objects with similar surfaces, allowing you to compare the end results. After you have calculated the area, you can start electroforming the first walnut. Note the settings of the power supply, the duration of the process and other important data such as the number of layers of conductive paint and their drying time.
If the result is not to your liking, you can make adjustments and compare the result of the second walnut with the first. If the result is to your liking, you have found the right ampere setting for your electroforming setup. For example, if you get the best result with 0.5 amps with a 40 cm² area, you know that you need 0.125 amps per 10 cm² of surface area for future projects to achieve the same result.
Preparing organic material for electroforming
To achieve good results, it is crucial to prepare the item properly.
Make sure that all organic material is completely dry or preserved to prevent wilting and rotting during preparation, or to avoid later problems during electroforming. Moisture in objects such as a flower can expand due to heat, which can cause cracks in the sealer, conductive paint or copper layer during the later process.
Below are some ways to prepare organic matter:
- Between books: For example, squeeze multiple leaves between books and add something heavy to apply pressure. Wait at least a week, preferably two, until they are completely dry.
- Iron: Place leaves between two sheets of baking paper and iron them at a low temperature to speed up the drying process and prevent burning.
- Oven: Heat organic matter such as acorns, pine cones and wood at a low temperature (75 °C – 90 °C) for about two hours to remove excess moisture before using it in the electroforming process.
- Silicon dioxide sand: Use this sand to preserve fresh leaves and flowers and keep their shape. Place the sand at the bottom of a container, place the objects to be preserved on top, cover completely with sand, and close the container or cover it tightly with plastic wrap. After 3-5 days, carefully remove the objects from the sand and brush them off if necessary.
Use the Verzinkshop Conserve conductive paint as a preservative sealer and conductive paint in one! This conductive paint acts as both a preservative sealer and a conductive layer and can even be used on slightly damp objects such as a freshly picked flower. Submerge the object for a few seconds and let it dry thoroughly for several hours before you start electroforming. This is ideal for preserving organic material such as leaves, twigs, bones or insects that are still fresh.
Placing and anchoring fasteners and hanging material
After designing, it may be necessary to attach an anchor to the object in order to hang it. Examples of anchors are connecting rings, eye pins or unvarnished copper wire.
When choosing the inside size of the anchor, you have to take electroforming into account, because this builds up copper. For example, if a ring with a diameter that is too small is used, the copper that builds up on the design during electroforming can make the opening of the ring too small or even close it completely.
The same goes for rings that are meant to be worn on your finger. Design rings that are half to one size larger than the final size.
You can use different types of glue to attach the anchor to the design. Super glue and white craft glue work very well. Allow the adhesive to cure for several hours or overnight before continuing with the conductive paint or coating.
Electroforming on a bare object, such as a 3D printed ring, automatically builds up mass of copper. It is also possible to create or adjust your design by using, for example, resin or modeling clay and attaching the anchors to it.
Look here for various materials and accessories for electroforming: electroforming accessories.
Electroforming object sealing and waterproof finishing
Waterproof sealers are essential for designs that contain organic material such as leaves, flowers, pine cones, acorns, feathers, insects, seeds, honeycomb, shell, wood, bone, and other organic or porous material.
It is important to treat organic material with a waterproof sealer to protect it from contact with the electroforming liquid. Without this protection, problems can occur during the electroforming process, the pool can become contaminated or the organic material can be affected.

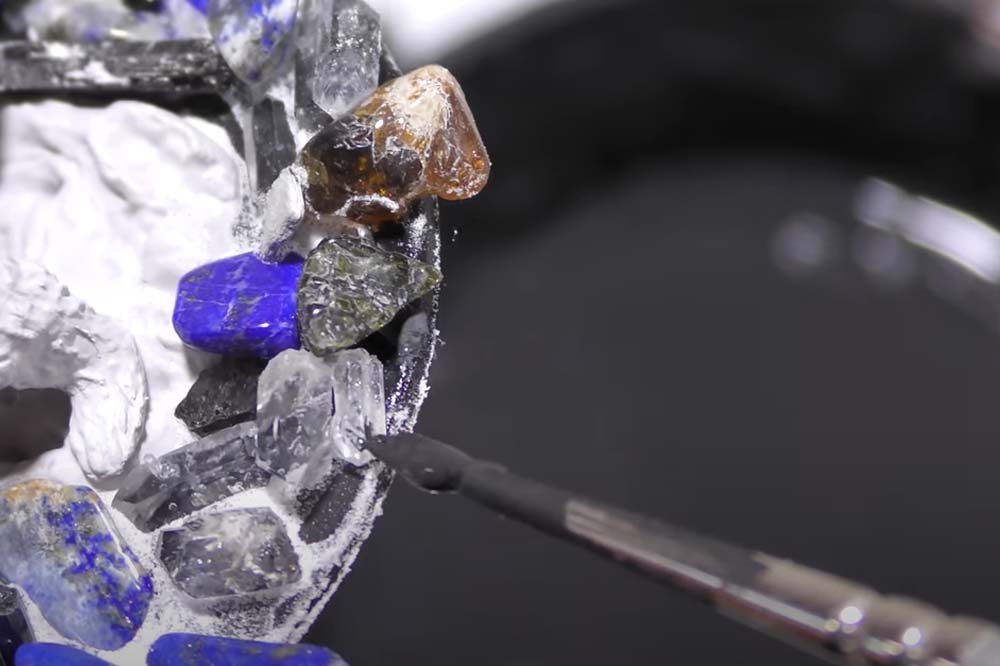
For rings with gemstones, or if you only want to copper down part of an item, you can also use the sealer to mask and protect that part during the electroforming process. For example, some gemstones cannot withstand acids such as sulfuric acid and will be damaged as a result. After the electroforming process, you can remove the sealer again.
Applying sealer
There are several sealers you can use:
- Verzinkshop Electroforming sealer: Very suitable for applying a waterproof coating and for use with water-based conductive paint.
- Verzinkshop Conserve: Conductive sealer on solvent basis.
- White craft glue
- Resin
- Nail polish
- Other paint of your choice
Choose the sealer that best suits your project.
You can apply a sealer in different ways:
- Immerse: Hang the object, such as a flower or twig, on a piece of copper wire, paper clip or nylon to dip it into the sealer. Hang the object to dry and collect any excess sealer that accumulates at the bottom or edges of the object.
- With the brush: Some objects cannot be submerged. For example, apply the sealer to a spring with a brush by placing the spring on a glass plate and carefully painting the sealer along with the structure of the spring. Make sure that the spring does not stick to the glass plate.
- Spray or airbrush: Apply a clear coat with an aerosol or airbrush for an even finish, especially for fine details on 3D prints, for example. This can be difficult to apply evenly to objects with many deep shapes or texture.
It is necessary to allow the sealer to fully cure and dry before applying a conductive paint. The drying time depends on the type of sealer, the size of the design and the number of layers applied. Insufficient curing can lead to cracks or bulges in the copper, an undesirable structure, or other problems.
For example, if you want to copper a porous soft children’s shoe, you must first make it sturdy and make it waterproof. Immerse the shoe in the electroforming sealer and let it soak in well for 10 minutes. It can take more than 2 days for the sealer to fully cure.
Verzinkshop Conserve is a unique conductive paint and sealer in one! With this paint you can directly preserve organic material and make it conductive at the same time. Even slightly damp material such as a freshly picked flower. Immerse the object in the paint for a few seconds and then let it dry thoroughly. Within a few hours, the object can be provided with a nice layer of copper with an electroforming kit!
Making objects conductive for the electroforming process
Before you start applying a conductive coating, it’s crucial to make sure the design is clean and free of dirt, skin oils, dust, or other contaminating material. This prevents negative influences on the end result.
On our webshop you will find different types of conductive paint:
- Verzinkshop Carbon conductive paint: This water-based graphite paint dries quickly and has a high carbon content, which ensures a very low current resistance. It is highly conductive and has a thin consistency, ideal for applying thin layers with fine details. The paint has light sealing properties. For porous or soft organic material, we recommend applying Verzinkshop Electroforming Sealer first.
- Verzinkshop Conserve or Conserve 3D conductive paint: A unique solvent-based conductive paint that can preserve slightly moist organic material without a separate sealer. A freshly picked flower can be immediately immersed in the paint without drying beforehand. This preserves the appearance of the flower and gives beautiful effects. The paint dries quickly and can be treated with electroforming after a few hours. It leaves a plastic conductive layer, ideal for preserving flowers, twigs, bones and more.
- Verzinkshop Conductive Copper Paint: A very gradual water-based paint that dries fairly quickly. It is particularly suitable for large objects due to its very low current resistance.
Always keep conductive paint tightly sealed when not in use to prevent evaporation of water or solvent. If the paint becomes too thick, dilute it according to the instructions in the manual.
Apply conductive paint to make the object conductive
There are several methods for applying conductive paint:
- With the brush: Apply the paint in thin, even layers. Please note that any texture may be visible in the final object. Where the paint is applied, the copper will build up during the electroforming process. Cover the whole object or just parts of it. Make sure each end touches another conductive part or is connected to copper wire, as the electric current needs a path to run through.
- Submerging: Attach the object to a piece of copper wire, nylon wire, or a paper clip and immerse it in the conductive paint. Shake off any excess paint, hang the item on a drying rack, and catch any paint that may accumulate on the underside of the item. Be aware that paint can accumulate on the bottom during drying. Shake this off to prevent dried drops.
- Airbrush: Spray from about 15 to 20 cm away for even coverage in thin layers. Pipe in 2 or 3 thin coats for fine details. Make sure that the chosen paint can be used in an airbrush!
When applying water-based paint to smooth materials such as glass, it can be tricky and the paint can slip off. This can be solved by first applying a coat of sealer or primer, lightly sanding or polishing the surface.
Air bubbles in the conductive layer
Air bubbles in the conductive layer often occur when the layer is applied too thickly or when there are air bubbles in the paint. If you notice any air bubbles while the paint is still wet, you can gently pierce them with a needle to remove them. Once the paint is dry, you can use fine sandpaper to sand the surface smooth.
If you are satisfied with the thickness of the layers, you can measure the electrical resistance of the object with a multimeter. The electrical conductivity increases the longer the object dries.
When the object is completely dry and conductive, you can continue with the electroforming process. Use one of Verzinkshop’s various electroforming kits to create your own unique jewelry or other objects. Verzinkshop offers a wide range of electroforming supplies to help you achieve the desired result.
Electroforming bath setup
Setting up an electroforming bath requires careful preparation and attention to detail. With every electroforming kit from Verzinkshop you will receive an extensive manual. Here’s a quick overview of the most important steps for setting up your electroforming tub correctly. Make sure you work in a warm, well-ventilated room temperature area and choose a stable platform for the bath. Keep the workplace out of the reach of pets and children.
Electroforming kit for 3D prints and miniatures
The 3D-Print electroforming kit includes additional Graphit 33 conductive spray and Conserve 3D sealer, ideal for applying copper layers to 3D prints with fine details.
Electroforming kit for organic material
The organic material electroforming kit with the Conserve and Carbon conductive paint and acrylic electroforming sealer, perfect for copper-plating organic materials such as leaves, twigs or flowers.
Electroforming kit for model making
The model building electroforming kit contains extra Graphit 33 conductive spray and Conserve 3D sealer, ideal for applying copper layers to fine details on model building objects such as rims and engine parts.
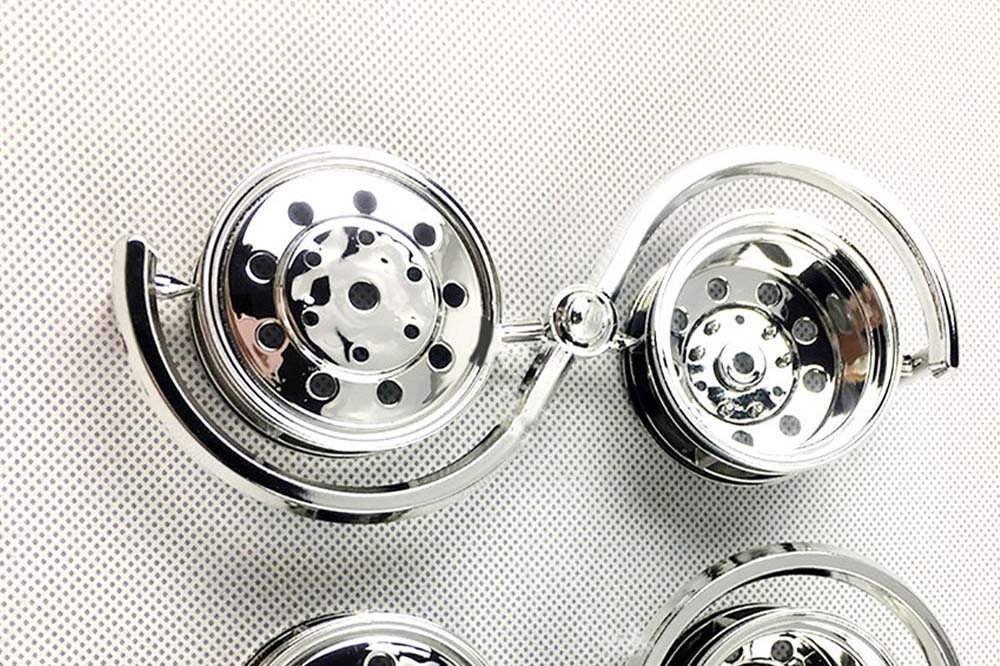
(rims were then finished with chrome)
Electroforming kit for jewelry
An electroforming kit for jewelry with Conserve and Carbon conductive paint. It allows you to sell jewellery and small objects, with a choice of quick-drying water- or solvent-based paint.

Electroforming kit for baby and children’s shoes
A children’s shoe electroforming kit contains electroforming sealer and enough conductive paint to dip shoes in and create a nice copper layer.

Super electroforming kit
This super electroforming kit contains everything: Carbon, Conserve, conductive copper paint, Graphit 33, and electroforming sealer. It allows you to sell everything from organic material to artwork and jewelry.
Basic electroforming kit
Electrolyte V-Brite 100 seller kit available with V-Brite 100 electrolyte for thick copper layers, ideal for filling in imperfections, or the V-Brite 200 seller kit with V-Brite 200 for applying thin copper layers with fine details. This comes without conductive paint.
Each kit contains test plates of 25 or 50 cm² and comes standard with Verzinkshop V-Brite 200 copper electrolyte. This electrolyte is ideal for applying a shiny copper layer with fine details to complex objects. It results in a soft and pliable copper, very suitable for copper-plating organic and plastic material.
Follow these steps to set up your electroforming bath:
- Placement of the tank: Place the cleaned electroforming tank on a stable platform.
- Circulation Pump: Place the circulation pump in the tank to ensure even circulation of the electrolyte.
- Add liquid: Carefully pour the included electrolyte into the tank. Then add the brightener according to the instructions in the manual.
- Insert anodes: Place the copper anodes in the container with electrolyte, connect them to each other, and connect them to the power supply. These anodes provide the copper for the process and will need to be replaced over time.
- Mark Liquid Level: Mark the liquid level on the side of the electroforming tank with a marker. The heat can cause some water to evaporate. Refill the bath with distilled or demi-water to the marked level. Only the water evaporates, so you don’t have to worry about losing other ingredients.
- Installation of the nylon bar: Install the supplied nylon bar over the tank. This bar is used to hang the objects in the electrolyte.
Your electroforming bath is now ready for use. Attach an object to a piece of copper wire, hang it on the nylon bar in the electrolyte, connect the negative cable of the power supply and turn on the power supply. The electroforming process will now begin. Follow the instructions in the kit carefully to achieve the best results.
Preparing the object for the electroforming process
Always wear gloves when handling the painted objects to avoid contamination from skin oils, which can affect the finish during the electroforming process. Follow these steps to prepare the item correctly:
- Prepare copper wire: Cut a piece of thin copper wire. This should be long enough to allow the object to hang in the tank, at the nylon bar, and leave the other end outside the tank for connection to the power supply.
- Use only thin copper wire to prevent too much current from diverting away from the object.
- Use bare copper wire, not covered with insulation or coating.
- Hanging Object: Attach the object to the copper wire and hang it on the nylon bar above the tank.
- Add weight: Items such as plastic, wood, or other organic materials may require a weight to keep them from floating. Use a weight of nylon thread to anchor the object until the cathode has built up enough copper. Glass and nylon wire are ideal because they do not affect the electroforming fluid.
- Leaves and twigs: objects such as leaves and twigs can float on the electrolyte as long as there is a piece of copper wire, and where it connects to the object, in contact with the electrolyte. Copper will build up automatically, making the object heavier and sinking.
- 3D prints: These float quickly on the electrolyte. You can fill them with sand through the leak hole in the 3D print before gluing it shut to make the objects heavier. This will make them sink easily into the electrolyte. For small objects, it is wise to print them out solidly.
The electroforming process
Make sure that all parts, such as cable clamps and copper wire, are clean and free of oxidation to avoid connection problems and power interruptions. Exposure to the electroforming fluid can cause oxidation on splice terminals, copper tubes, and anodes. This is normal and can be removed later with a scouring pad or sandpaper.
The copper electrolyte is made up of mild chemicals, including copper sulfate, sulfuric acid, and additives. Although it is relatively safe, you should always use proper personal protection when working with chemicals.
- Setting Power Supply: Turn on the power supply, turn the amp knob all the way to the left and the voltage knob all the way to the right. Switch off the power supply again and connect the red positive and black wire to the power supply.
- Submerge Object: Gently immerse the object in the electrolyte, making sure it hangs evenly in the center of the tank without touching the anodes.
- Connecting cables: Attach the red positive wire to the copper anodes and the black wire to the copper wire of the object (cathode). Make sure that plus and minus do not make contact.
- Setting the current: Turn on the power supply and set the current to the calculated amperes per square cm (0.1 amps per 10 cm²). Start with a lower current setting for the first 10 minutes to build up an even layer of copper. Gradually increase the current in increments until the calculated value is reached. This will prevent too much current from passing through too small a surface, which can lead to unwanted structures or burnt areas.
- Copper formation: The copper begins to form around the place where the copper wire or anchor touches the object. Depending on the size of the object and the desired thickness of the copper layer, the process can vary from half an hour to 24 hours, or longer.
- Neutralize: Once the object is ready, turn off the food and remove it from the bath. Rinse it thoroughly and neutralize any remaining acids in a solution of baking soda and water to prevent discoloration or further oxidation.
Tips and information
- Voltage drop: The voltage will gradually drop as the copper spreads across the surface of the object, which is normal.
- Build up copper thickness: Make sure that enough copper is built up when designing with thin materials or fragile parts.
- Remove air bubbles: Gently shake the copper wire if there are air bubbles on the object, as they can disrupt the copper layer.
- Check and adjustment: Check the thickness and texture of the copper layer every hour. For long-term processes, an increase in amperes may be necessary.
- Amp settings: A low amp setting provides a fine copper layer, while a higher setting provides faster build-up and more structure.
- Replacing copper anodes: Keep an eye on the anodes and replace them if necessary.
- Remove anodes after use: Always remove the anodes from the bath after use to avoid oversaturation of copper ions in the solution.
Getting an even copper electroforming finish
Sometimes an object comes out of the electroforming tank with a pink or salmon tint and a dull, matte texture. This can be fixed, and we’ll discuss how to fix it later. However, there are several factors that can contribute to this result. If adding copper glazing agent to the electrolyte does not help, one of the following causes is likely:
- The ampere setting is too low for the surface area (under the rule of thumb of 0.1 amps per 10 cm²).
- Supersaturation of copper in the solution due to too much surface area of the anode in relation to the size of the object.
- Low levels of distilled water, which can upset the balance in the solution.
- Contamination of the bath by organic matter or other impurities.
- An incorrect pH value of the liquid due to contamination. The pH value should be between 0.5 and 1. A higher value can cause problems.
If the copper layer is brittle, has an undesirable structure, or is glittery, the electrolyte should be.
A 2:1 ratio between copper anode and the object to be coated helps to balance the copper and acid ratios in the solution. This can be achieved by adjusting the amount of immersed anode to the size of the object.
Example: If you have an object of 50 cm² and an anode of 200 cm², you hang the anode halfway (100 cm²) in the liquid. This helps to keep the copper-to-acid ratio stable, leading to a smooth finish. Typically, there are two anodes in the tank, so adjust the immersion of both anodes to maintain this balance.
Too much copper in the solution can lead to oversaturation of copper ions, which can result in the pink/matte finish and undesirable texture.
With each use of the bath, the V-Brite X brightener is gradually consumed and must eventually be replenished. Add a few milliliters, as described in the brightener manual, if the brightener wears off, but be careful: too much brightener can cause problems in the electrolyte.
Temperature also plays an important role. If the temperatures are too low, problems can occur in the process. Make sure the workspace is at least 18 °C or higher. Use an aquarium heater or heating mat under the tank if the temperature is lower.
During the electroforming process, a copper sludge is created from the copper anodes. This is normal and will collect at the bottom of the tank. It is important not to disturb the liquid or anodes during the process, as otherwise the sludge will rise and adhere to the design.
To prevent the sludge from contaminating the liquid, you can wrap anode filter bandages around the anodes.
In addition, a filter pump with a built-in filter can be used to remove contaminants and keep the fluid moving. This ensures an even copper deposit and reduces the chance of air bubbles on the object because the water continues to circulate.
Storage and Maintenance of the Electroforming Fluid and Materials
After completing the electroforming process, it is important to store and maintain the materials and fluids correctly. Are you going to continue the next day? Then it can’t hurt to leave the anodes in place. If you leave it on for a few days without using the bath, it, and the connected cables, will oxidize.
Follow the steps below for optimal operation and lifespan of your electroforming equipment:
- Storing Materials
- Remove all materials such as the copper anodes and the filter pump from the electroforming bath.
- Close the tub with a lid and store it in a safe place, out of the reach of children and pets.
- Do not store the copper anodes in the electroforming bath, as they will oxidize and contaminate the electrolyte. Place the anodes in clean sealed water with a little sulfuric acid or rinse them well and dry them thoroughly. In case of oxidation, lightly sand and rinse the anodes, or dip them in a light sulfuric acid solution to remove the oxidation.
- Thoroughly flush the circulation pump with clean water to prevent copper electrolyte buildup, which can lead to blue crystals and damage to the pump.
- Filtering the Electroforming Liquid
- In case of contamination, the electroforming liquid can be filtered. Place a few coffee filters in a funnel and filter the liquid through them.
- After filtering, top up the liquid with distilled water (do not use tap water) if the level drops below the marked line on the tank. Evaporation of water is normal during the electroforming process.
- Rinsing and Maintaining the Tank
- Rinse the electroforming tank completely and dry it thoroughly with a towel to remove any remaining water droplets or contaminants.
- Removing Corrosion from Anodes and Metals
- After several electroforming sessions, corrosion will occur on the anodes, connecting cables and other metal parts. Remove this corrosion regularly by wiping it away or sanding it with a scouring pad or sandpaper. This ensures a good electrical connection during the process.
- After cleaning, rinse the parts thoroughly and dry them completely.
- Removal of Sealers and Masks
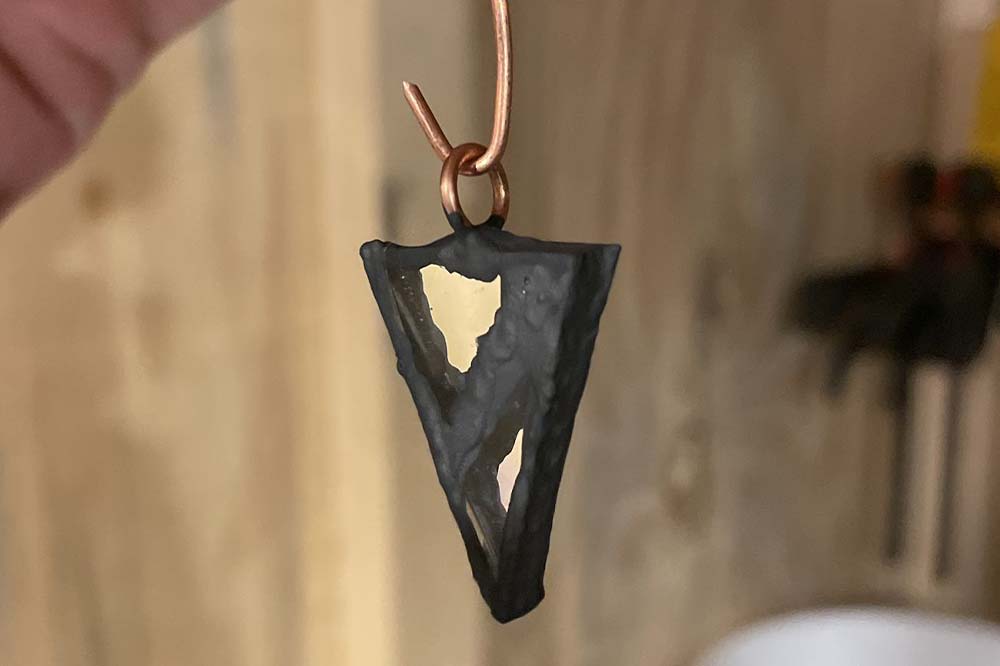
- Objects such as rings with gemstones may need to be partially taped. After the electroforming process, you can remove the sealer on the uncoated part of the gemstone.
- Use a toothpick or other tool to gently scrape off the sealer. If necessary, soak the item in hot water to soften the sealer. This only works with water-based sealers.
- Liquid latex as a sealer comes off easily and is ideal for masking specific areas, but can be difficult to remove if too much time has passed.
- For solvent-based sealers, use acetone or nail polish remover to dissolve them. If you’re concerned about damaging the original material, such as certain gemstones, use a nail polish remover without acetone.
- Clean any remaining sealer and any visible conductive paint with warm water or the appropriate solvent for the sealer used.
Polishing Salmon and Dull Copper
Converting dull, salmon-colored copper to a shiny copper finish is a relatively simple process with the right techniques. Here are some effective methods for polishing your electroforming copper objects:
Polishing methods
- Dremel with Brushes: A Dremel with brushes is one of the fastest and most popular ways to polish copper. This tool is particularly effective for achieving a glossy finish on smaller objects.
- Table Polisher: For larger and smooth objects without fragile or fragile details, a normal table polisher is very suitable. These machines offer a uniform polish and are ideal for larger areas.
- Manual Polishing: For a more manual approach, you can use a scouring pad, brass brush, or steel wool. These methods are useful for polishing smooth objects with few details or shapes.
- Electropolishing: Electropolishing is an electrochemical process that uses an electropolishing liquid in a tank to remove microscopic copper particles from the object. This process is ideal for fragile objects with many details that are difficult to polish with a machine or hand. It results in a very bright and smooth finish in a short time. Electropolishing requires a strong power supply. In the webshop you will find the Verzinkshop Electropolishing Liquid.
Problems and Solutions
- Peeling or Chipping of Copper: If the copper layer peels or crumbles during polishing, it means that the copper layer is not thick enough. Make sure that the object remains in the electroforming tank longer until the layer has the desired thickness. Depending on the base material and design, the electroforming time can vary from 4 to more than 24 hours.
Post-treatment
- Protective Treatment: After polishing, you can store the item in this shiny state, treat it with a patina finish, or apply another layer such as nickel, bronze, gold, or silver.
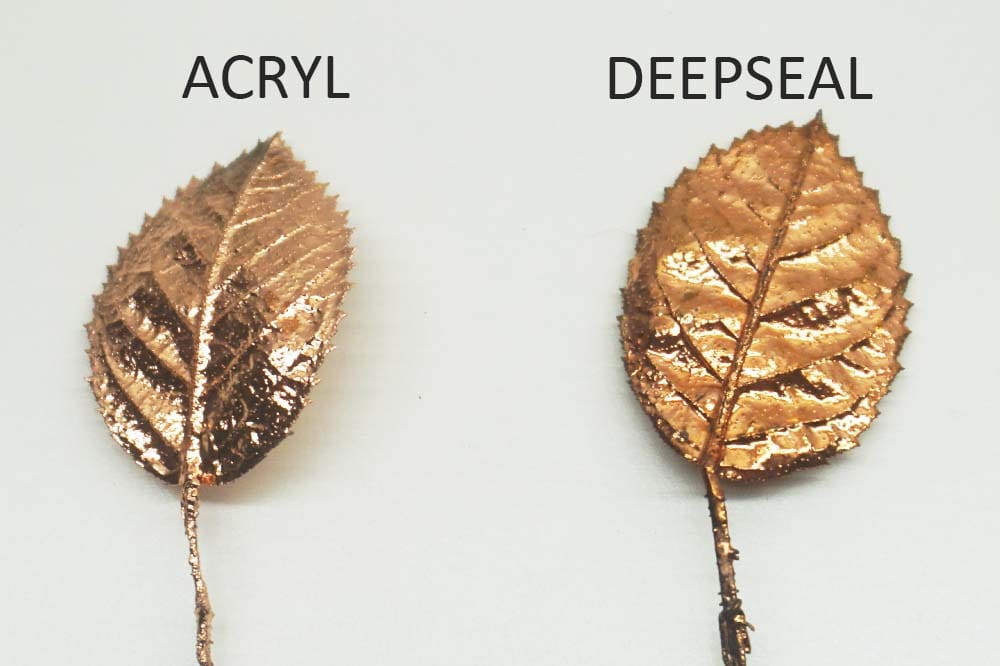
- Prevention of Oxidation: To maintain the shine and prevent natural oxidation, treat the copper with a protective lacquer or varnish. You can choose the Verzinkshop Acrylic Sealer or Electroforming sealer on a water-based basis, a wax, or an oil-based sealer such as the Verzinkshop DeepSeal Metal Sealer. Regular cleaning and polishing can also help to prevent oxidation and tarnishing.
Patina Application to Copper

With patina liquids, you can create an aged, oxidized look on copper, silver, and other metals. Verzinkshop offers different types of patina liquids with which you can achieve various colors and effects. We also have an extensive list of patina recipes to create unique colors yourself.
Patina Liquids from Verzinkshop
- Gunmetal Patina: Creates various colors on silver, copper, brass, and bronze.
- Brown Patina: Ideal for a rich, dark brown shade on copper and brass.
- Black & Brown Patina: Suitable for silver, copper, brass, and nickel for a deeper black or brown finish.
Safety and Application
- Safety: Always work in a well-ventilated area. Wear a safety mask, gloves, and protective goggles. Keep the liquids out of the reach of children and pets.
Application methods
- Brush: Apply the patina liquid with a brush to specific parts of the object. This offers the possibility to create unique effects by dabbing the liquid or applying it in strips.
- Submerge: Immerse the object completely in the patina liquid for even coverage. After drying, you can apply highlights with a Dremel and brush or scouring pad.
- Sealing container: Place the item next to a container of patina liquid in a sealed container, such as a bucket with a lid. The vapors of the liquid will create variable colors and effects on the copper. This process takes longer but can produce very interesting results, depending on factors such as distance, light, and temperature.
Finishing and Maintenance
- Applying Sealer: After applying the desired patina or other treatment, use a sealer to maintain the patina. Patina only works on bare copper or other metal and can be affected by the sealer you use.
Please note that the final colors of the patina or other finishes may change after applying a sealer.
Preventing oxidation
What causes oxidation? Natural green or blue oxidation can occur when the copper object comes into contact with moisture and other natural elements. This normal copper patina is what causes the green spots that become visible on the skin when wearing copper as jewelry. Oils and sweat from the skin, perfumes, lotions, bug sprays, sunscreens also cause unwanted oxidation and patina buildup. By treating the object with a water-repellent sealer, as explained in the previous step, this will be prevented. Clear nail polish is widely used as a quick and inexpensive sealer for small items such as rings and other jewelry. Very handy to treat the inside of a ring so that the copper does not stain your finger. Verzinkshop Water-based Electroforming Sealer is a water-repellent sealer that can be diluted 1:1 with water for a very thin protective layer, for fine details that dry almost invisibly.
Applying clear coat, clear, satin or matt, with a spray can provides good permanent protection against external influences. An oil-based sealer, such as the Verzinkshop DeepSeal Metal sealer, penetrates deep into the pores of the copper or patina and provides good water-repellent properties.
Wax or oil-based sealers have a slightly greasy or oily finish and are not permanent and will eventually need to be reapplied. This is highly dependent on the product, the use and the purpose of the object.
For frequently asked questions and various troubleshooting about electroforming, please look here: Electroforming Frequently Asked Questions & Problem Solutions.